 Update: After posting this, I came across several similar versions. Somewhat similar, but everybod'ys always have their own techniques. Mine works great for what I need, but improvise with whatever you have laying around.
After researching a lot of information about beauty dishes, I realized there was absolutley no good reason I couldn't make my own for a fraction of the price of professionally developed ones. There were a lot of good ideas I picked from through diyphotography and various other sights.
I started out with a few goals in mind. I wanted to make one small and portable enough for a Nikon SB-80DX or my other SBs. I wanted it light as possible so as not to bend the strobe down on the light stand, but I wanted it versatile enough to withstand moving from location to location. After viewing a few with the turkey roaster approach I decided they were too flimsy and not professional looking at all. I realize many photographers would not be concerned with the professional look, but I shoot senior photos and kids can be cruel. Heck, if my photographer showed up with a turkey pan I'd have made fun of him too at 18 years old. So keeping it aesthetically pleasing was a small concern. Here is what I came up with. I labeled everything step by step with as many photos as I could. Sorry for the low-quality images, but I was so anxious to actually build it, that I didn't take much time to snap the photos.
Step 1 - Gather materials and tools
Supplies:
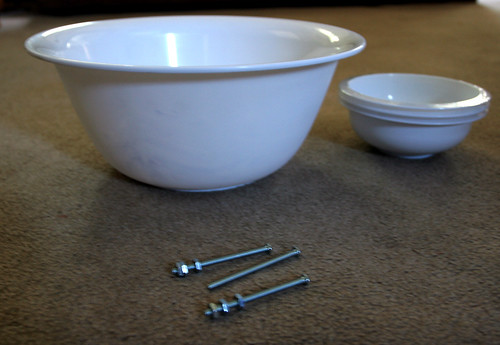
Large plastic mixing bowl. - Dollar General - $1.50
Standard pack of soup bowls - Dollar General - $1 for 3
Three bolts and six matching nuts - Local hardware store - $.93
Matte black spray paint- $??? Not sure, had it in the garage.
Tools:
Exacto knife
Drill (optional)
Marker
Old newspaper
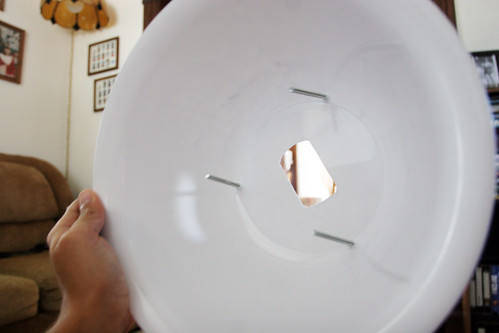
Step 2 - Mark the hole
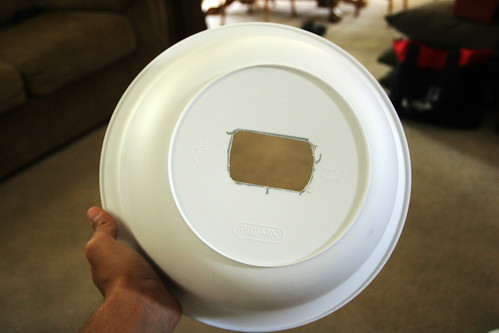
First take the large mixing bowl and flip it upside down so the bowl portion is facing the table or ground. Place the flash head you're going to use in the center. I just eyeballed it close. Next take you're marker and trace the outside of the flash. (You may want to use black so it blends in with the flash if it marks the head. I accidntally used silver and learned the hard way. I guess I could've used a pencil.)
Step 3 - Spray one standard bowl
You're going to need to spray the backside of one of the standard bowls at this point. My bowls were white and were reflecting all the light, leaving a solid circle in the middle, not a donut shape in the speculars. Technically I used a black bed liner spray, but I think matte black would work just fine. I personally like the bed liner spray though. It dried incredibly fast and made it textured as to reflect less light. Sorry, no photos of this.
Step 4 - Mark the bolt holes
You need to mark the holes you're going to drill in the lip of the standard bowl and the bottom of the mixing bowl. I placed the mixing bowl upside down on the floor again. Then I put the standard bowl upside down on top of it. Sort of like two igloos on
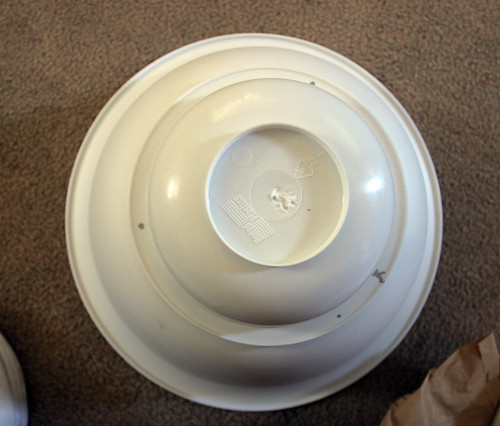 top of each other. Then I just marked arbitrary holes. I eyballed it again and placed the holes equally apart. Then I lifted the standard bowl and put marks in about the same places on the mixing bowl. Because your bolts will have a little play in them, you don't have to be exact, just close.
Step 5 - Drill holes
Now drill all the holes out. Make sure to use a drill bit slightly smaller than your bolts. You want them to squeeze in the holes to stay in place. Then do the standard bowl. Same concept.
Step 6 - Add bolts
Place the bolts through the back of the mixing bowl. It should be a nice tight squeeze. Then remove them and put them through standard bowl. Put them through so the head of the bolt is on the bottom side of the bowl. Basically if you were to set it on a table to eat out of the bolts would be sticking up in the air.
Step 7 - The nuts
Put one nut on each bolt about a half an inch up. Then put take the entire standard bowl and place it inside the mixing bowl so the bolts can suspend the standard bowl two or three inches away and reversed. (The bowls should now be facing each other and the black side facing out on the standard bowl. If the nuts were distributed evenly on the bolts, the standard bowl should be at about the same height all the way around. Now place the remaining nuts on the backside of the mixing bowl and tighten them down.
Steph 8 - Add to strobe, beautify
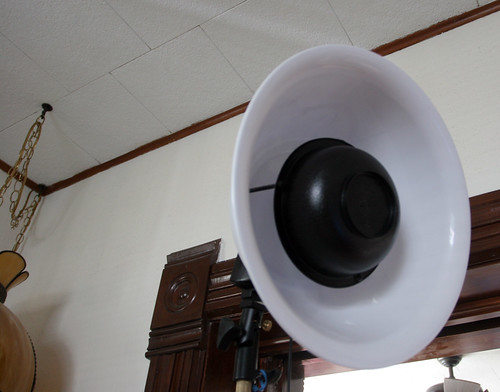
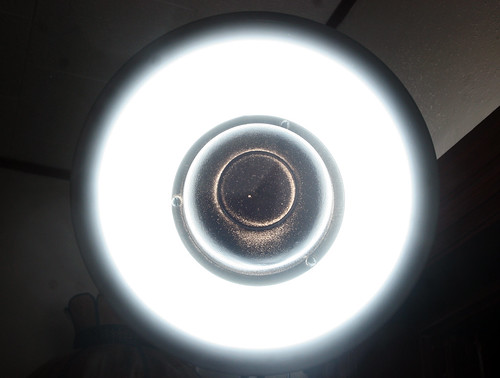
Now place the beauty dish on the flash head and beautify. You can see from the example You really get the donut hole shape.
I had a little trial and error with this. I originally left both bowls white, but didn't get the specular I wanted. I could've added another bolt and another series of nuts to keep the standard bowl from sliding down, but because I underdrilled the holes I didn't need to. I think it looks fairly professional works excellent. Plus it's nice and portable. If there's any questions let me know and I'll try to respond. Oh, and it helps to have velcro already attached to your flash and to cut that hole nice and tight so it squeezes onto the strobe head and stays in place. I will update with photos in a little bit.
Cheers!


No comments:
Post a Comment